How to programatically put data into Excel worksheets?
Create a new module
and copy and paste the code below into it. A detailed code description is given below the codebox.
1
2
3
4
5
6
7
8
9
10
11
12
					Sub printPowers()

					    Worksheets("Sheet1").Cells(1, 1) = 1

					    Worksheets("Sheet1").Cells(2, 1) = 2

					    Worksheets("Sheet1").Cells(3, 1) = 4

					    Worksheets("Sheet1").Cells(4, 1) = 8

					    Worksheets("Sheet1").Cells(5, 1) = 16

					    Worksheets("Sheet2").Cells(1, 1) = 1

					    Worksheets("Sheet2").Cells(2, 1) = 3

					    Worksheets("Sheet2").Cells(3, 1) = 9

					    Worksheets("Sheet2").Cells(4, 1) = 27

					    Worksheets("Sheet2").Cells(5, 1) = 81

					End Sub
VBA commands cannot be put into VBA editor just like that. They have to be organized into subroutines (Sub)
or functions (Function). There are at least two reasons for this:
- It lets you keep your code clean and comprehensible
- You can separate tasks from each other
Let us assume you want to create a macro doing some things (e.g. printing something into an Excel sheet, painting its cells, adding borders etc.) and then assign a keyboard shortcut to each of those tasks.
If all the code was put into VBA editor without being divided into separate subroutines, every time you would run this macro all the tasks would be executed, because VBA compiler would have no idea where one task ends and the other begins.
By dividing code into separate subroutines, VBA compiler knows which part of a VBA project is reponsible for a specified task.
Therefore, the macro should be organized as shown below:
1
2
3
					Sub printData

					    '(...)

					End Sub
1
2
3
					Sub colorCells

					    '(...)

					End Sub
1
2
3
Sub printData
'(...)
End Sub
1
2
3
Sub colorCells
'(...)
End Sub
By organizing a code into the structure shown above, all the tasks are separated from each other and can be executed independently. Furthermore, as it was said before, code is clean, readable and much more easier to be understood by someone who has to work with it.
As you have probably already noticed, every routine has to begin with the opening keyword
Sub (or Function) followed by its name:
Sub procedureName
Sub procedureName
When you type this line into your VBA editor and press Enter, the closing line will be automatically appended:
End Sub
End Sub
There are a few rules when naming subroutines, functions or variables, that are listed in the frame below:
Rules for naming subroutines and functions
- A name cannot contain spaces or special character except for underscore _
- A name must begin with a letter.
- A name should not contain characters specific to a particular language.
- A name cannot be any keyword. However, it can contain a keyword as a part of it. Only a few keywords have been
introduced so far (
Sub, Function,
End), but there will be more and more with
each lesson.
- A name of a routine (or function) should precisely describe what this routine (or function) does.
- Names are not case-sensitive. For VBA compiler it is all the same whether you name your routine
ProcedureName or PROCEDURENAME.
- It is conventional to name routines and functions in lowercase characters and use uppercase characters only for the
first letters of subsequent words to make it more readable, i.e.
ProcedureName (or procedureName) instead of procedurename or PROCEDURENAME.
- The name cannot be longer than 255 characters. However, in practice, for names to be convenient in use, they should not exceed 20-30 characters.
Sub, Function,
End), but there will be more and more with
each lesson.ProcedureName or PROCEDURENAME.ProcedureName (or procedureName) instead of procedurename or PROCEDURENAME.To summarize, all the tasks should be placed into separate routines and functions.
The body of a single routine or function is limited by its opening and closing lines:
1
2
3
				Sub procedureName        'start of the routine

				    '(...)

				End Sub                  'end of the routine
1
2
3
				Function functionName    'start of the function

				    '(...)

				End Function             'end of the function
1
2
3
Sub procedureName 'start of the routine
'(...)
End Sub 'end of the routine
1
2
3
Function functionName 'start of the function
'(...)
End Function 'end of the function
In the first few lessons we will use only routines (Sub). Functions will be introduced and described in details in sixth lesson.
Function or routine cannot be contained within another function or routine!
To write a new routine, first you have to close the previous one.
The code below is unacceptable and an error will be thrown while compiling:
1
2
3
4
5
					Sub Routine1

					    Sub Routine2

					        '(...)

					    End Sub

					End Sub
1
2
3
4
5
Sub Routine1
Sub Routine2
'(...)
End Sub
End Sub
Let's back to our first macro that print powers into cells of Excel's worksheet.
The second line of the code contains the following instruction:
2
Worksheets("Sheet1").Cells(1, 1) = 1
2Worksheets("Sheet1").Cells(1, 1) = 1
In this line VBA compiler gets three pieces of relevant information:
- the name of the worksheet in which data are to be printed - in this case worksheet Sheet1,
- coordinates of the cell in which data are to be printed - in this case the cell located at the intersection of first row and first column (in previously selected worksheet Sheet1),
- value to be printed into the previously selected cell is specified on the right side of the equals sign.
The general form of a statement that displays something in an Excel worksheet looks like this:
Worksheets("sheetName").Cells(row, column) = value
or in its shortened form:
Cells(row, column) = value
Worksheets("sheetName").Cells(row, column) = value Cells(row, column) = valueIf you use the shortened form, where a sheet is not specified, value will be displayed in the currently active sheet.
The worksheet name given after the keyword Worksheets must be enclosed in quotes.
Worksheet names are not case-sensitive and the command Worksheets("Sheet1") is exactly equal to
Worksheets("sheet1").
The statement above is used in the next few lines of the code to display consecutive powers of 2 in the sheet:
3
Worksheets("Sheet1").Cells(2, 1) = 2
Value 2 will be input into the cell A2 (row 2, column 1) in the worksheet Sheet1.
3Worksheets("Sheet1").Cells(2, 1) = 2
4
Worksheets("Sheet1").Cells(3, 1) = 4
Value 4 will be input into the cell A3 (row 3, column 1) in the worksheet Sheet1.
4Worksheets("Sheet1").Cells(3, 1) = 4
5
Worksheets("Sheet1").Cells(4, 1) = 8
Value 8 will be input into the cell A4 (row 4, column 1) in the worksheet Sheet1 and so on.
5Worksheets("Sheet1").Cells(4, 1) = 8If the given name refers to a sheet that doesn't exist, an error will be raised!
Try, for example, to add the following line to the analyzed code (before End Sub line) and
run the macro:
Worksheets("NonExistentSheet").Cells(3, 2) = 1
Worksheets("NonExistentSheet").Cells(3, 2) = 1
You will be able to run this macro but when the program gets to this part of the code, the following error will occur: Run-time error '9': Subscript out of range.
The last line of the code has been already discussed at the beginning of this chapter.
12
End Sub
12End SubIt informs the compiler that this subroutine ends at this point.
Putting comments in VBA code
As you may have noticed, in previous examples there were some lines of code preceded by apostrophe and displayed in
green font. These two together means that this part of code is a comment.
'This is a comment
'This is a comment
If you want to comment out a line of code, just type an apostrophe (') as the first character in this line.
You can include whatever you want in your comments, since they are ignored by the compiler and have no effect on macro execution. However, it doesn't mean that comments are completely useless.
The two most important functions of comments are described below:
-
In comments you can describe in details complex or unusual parts of code, making them easy to understand for yourself
and for any other person using this code. You might think you don't need any description of your own code, since you have
created it and you understand it quite well. However, memory is fallible and you usually find it difficult to understand
the code you have written by yourself a year or so ago, unless you have it well commented.
-
Comments let you easily test different versions of your macros.
Let's assume you have written a very long procedure and you wonder how it would work if you remove some lines of code.
You don't have to delete these lines and store them in a separate file just in case they turned out to be necessary.
You can just comment these lines out by typing an apostrophe at the start of them, making them completely invisible
for the compiler. When you decide later that this part of code is necessary, you can just uncomment it by removing
the leading apostrophes, making it again a part of your executable code.
Let's assume you have written a very long procedure and you wonder how it would work if you remove some lines of code. You don't have to delete these lines and store them in a separate file just in case they turned out to be necessary. You can just comment these lines out by typing an apostrophe at the start of them, making them completely invisible for the compiler. When you decide later that this part of code is necessary, you can just uncomment it by removing the leading apostrophes, making it again a part of your executable code.
How to break a line of code into multiple lines?
It is quite common that a line of code is too long to fit on the screen. Example of such a long line is shown on the picture below:


The simple way is to just scroll the screen using the scroll bar in the bottom of the code editor (bordered in red on the picture above). However, this is not the perfect solution.
A much better way is to break a long line of code into shorter ones, to make it possible to read without scrolling.
In order to break a line of code, you must inform the compiler that two or more consecutive lines are linked with each other and
make a single statement that is simply divided into multiple lines for a better transparence.
You can do that by using line-continuation character - combination of space and underscore ( _).
You should place a cursor at the end of the line you want to break, append space and underscore and press Enter to go to the new line.
When the compiler recognizes combination of space and underscore, it consider the line before and after it as a single statement.
At the picture below you can see the long statement discussed before, divided now into two shorter lines.


Long statements can be broken into more than two lines. Technically, the code below is also completly correct (however,
it is quite foolish):


A single statement can be broken into up to 25 shorter lines.
How to improve your work efficiency by using autocompletion (Intellisense)?
There is a great feature in the VBA editor called Intellisense that will save you a lot
of work and time when writing code.
Intellisense is a mechanism of autocompletion that suggests keywords and commands based on what
you have already typed.
Try to type the command below in your VBA editor in order to see how Intellisense works:
Worksheets("Sheet1").Cells(1, 1) = 1
Worksheets("Sheet1").Cells(1, 1) = 1
Once you have typed first two letters, stop typing and click Ctrl + Space or
Ctrl + J on your keyboard (the first combination is much more convenient).


As you can see on your screen and on the picture above, a list pops up that contains all the available commands
matching to what you have just typed (in our example wo).
Now you can complete the command you are typing by using navigation arrows to select a proper command and clicking
Space or Tab key to confirm your choice (it is also possible
to confirm it with Enter but VBA editor will automatically move you to a new line, what
is quite irritating).
Notice that not only built-in functions and routines but also your own ones are included in a list displayed by Intellisense.
VBA commands are not case sensitive!
You can write all your code in capital or small letters. It is up to you since the VBA editor sees no difference and will format the code its own way after you will move to a new line.
For example, if you write:
WORKSHEETS("Sheet1").CELLS(3,1) = 4
VBA editor will format it like below after you move to a new line.
Worksheets("Sheet1").Cells(3,1) = 4
WORKSHEETS("Sheet1").CELLS(3,1) = 4 Worksheets("Sheet1").Cells(3,1) = 4How to run macros?
It is about the time to run your first macro.
There are several ways to run a macro. They are listed below. However, some of them are not described in details now, because it would involve complex issues we have not discussed yet.
-
Clicking F5 in the VBA editor
In order to run a macro this way, you have to move the cursor to the body of the function or subroutine you want to run and click F5 key.
If you click F5 when the cursor is out of any function (at the beginning or the end of the module), the list of all available macros will be displayed allowing you to select the macro to be run.
-
Clicking an icon on the VBA editor toolbar
The second way to run a macro is by clicking Run Sub/User Form icon on the VBA editor toolbar (bordered in red in the picture below).

There are the same rules as previously described for running macro by clicking F5. You have to move the cursor to the body of the function you want to run.
-
Running a macro from the Excel toolbar
It is also possible to run a macro directly from the Excel toolbar.
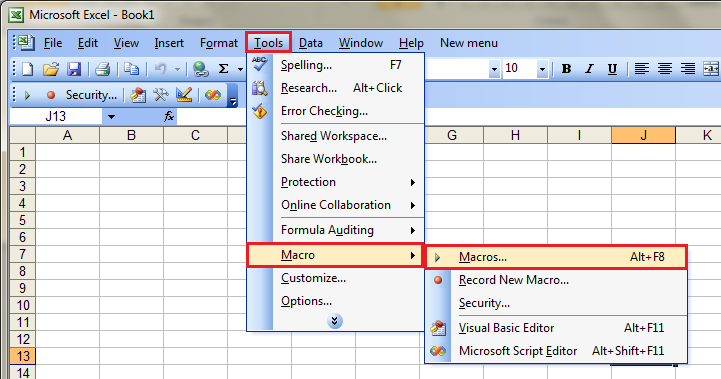
In order to do that you have to click the following menu items:

After clicking Macros ... menu option, the list of all available macros will be displayed allowing you to select the macro to be run.
This way of running macros is suitable for end users, rather than developers. When you need to run macros frequently it is a huge waste of time to do it this way since it involves switching to the Excel window.
-
Clicking an icon on the Excel toolbar
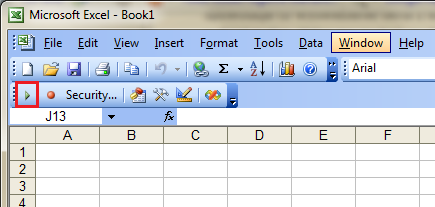
Another way to run a macro is by clicking Run button on the Excel toolbar, bordered in red in the picture below (it was discussed in the previous lesson how to display Visual Basic toolbar in Excel).

After you click this icon, the list of all available macros will appear and you will be asked to select the macro to be run.
However, it is not very efficient way for developers to run macros since it involves switching between Excel and VBA editor.
-
Assigning macro to a keyboard shortcut
In order to assign a keyboard shortcut to a macro, first you have to display the list of all available macros. You can do it by clicking Run icon on the VBA editor toolbar or the following menu items on the Excel toolbar:
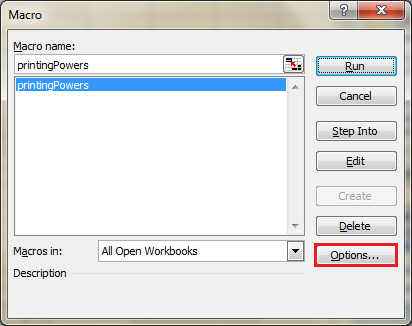
The list of macros mentioned above looks like shown below. You have to select the macro you want to assign to a shortcut key and click Options ... button (bordered in red).

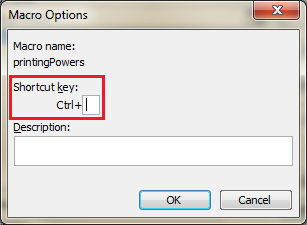
The Macro Options window will appear on the screen where you should type a key you want to assign to your macro (in the field bordered in red on the picture below).

It is also possible to assign a keyboard shortcut to a macro dynamically when it is executed. You will learn how to do this later in this tutorial.
-
Assigning macro to a worksheet event
It is possible to automatically run macro when a certain event occurs like double clicking in cell A1 or opening a file, etc. You will find out how to do that later in this tutorial.
-
Adding a new menu item to the Excel menu bar, that run your macro
Later in this tutorial you will find out how to add your own menu items to the Excel menu bar and how to link macros to them, as shown on the picture below:

-
Running a macro from the Immediate window
Actually, we haven't even discussed yet, what the Immediate window is, so there is no point at this moment to explain how to use it to run macros. We will get back to this Subject later.