08 - Interaction with users
In this lesson we will focus on the ways to communicate with users from your VBA application. You will learn how to
display messages for users and read their responses (i.e. confirmation window when a user wants to delete a file) and
how to receive the input data from users that should be later used by the application.
But before we move to this subject, we get back to invoking functions for a moment and discuss a few helpful hints.
As you already know, when invoking a function or a procedure, you can pass some input parameters. In the lesson about
functions you have also learned that a single function/procedure can take up to 60 parameters and part of them (or
even all of them) can be optional.
Look at the code below:
1
2
3
4
5
6
7
8
9
10
				Function salaryAfterTax(baseSalary As Long, _

				     Optional taxRate As Single = 0.18, _

				     Optional familyTaxCredit As Single, _

				     Optional lowIncomeTaxCredit As Single, _

				     Optional educationTaxCredit As Single, _

				     Optional otherTaxCredits As Single) As Long


				    salaryAfterTax = baseSalary - (baseSalary - familyTaxCredit - _

				       lowIncomeTaxCredit - educationTaxCredit - otherTaxCredits) * taxRate

				End Function
You should be well acquainted with this function, since we have already discussed it a quite few times.
For the purpose of this chapter this function has been modified again - five new optional input parameters have been
added - in order to present you an example of function with lots of optional parameters (Before pasting it to your
VBA editor, make sure you have removed the previous version! There cannot be two or more functions with the same
name in a single project).
As you know, optional parameters can be passed to the function but they can be omitted as well.
Let's say you want to use the function above and the only optional parameter you want to pass is the last one -
otherTaxCredits (of course, the parameter baseSalary must be also passed since this is mandatory parameter).
There are two ways to pass only the last optional parameter and skip the rest of them (use Immediate window when testing it!):
The first way is presented on the code listing from the Immediate window below:
?salaryAfterTax(5000, , , , , 1000)
In this case function salaryAfterTax has been invoked with parameter baseSalary equal
to 5000 and parameter otherTaxReliefs equal to 1000.
As you can see, if you want to skip an optional parameter, you just need to type a blank space and comma that is a signal
for the compiler that you want to move to the next parameter.
This method has its pros and cons.
Its major advantage is that it is fast and convenient - you just need to type a blank space and comma to skip an
unnecessary optional parameter and go to the next one.
The most important drawback of this method is its poor readability. When you take a look at the code above you
cannot say it immediately which optional parameters are passed and which ones are omitted. Actually, it is not that
hard in this example, since it has only five optional parameters. But what if a function takes 20 optional parameters
and you want to pass only 12th of them?
When considering functions with a lot of optional parameters, another drawback of this method comes to light. If you want to invoke
such a function and omit most of the optional parameters, you need to put a lot of blank spaces separated by commas - it is time-
consuming, hard to read and you can easily make a mistake, since when inserting so many spaces and commas you can lost track of what
parameter are you currently at. The latter can be minimized by Auto Quick Info - VBA editor feature responsible for highlighting
current argument when invoking functions/procedures and specifying its input parameters (as on the picture below). But still, this is
not recommended method for function with more than 4-5 optional parameters.

The second way of invoking functions is especially helpful for the functions with many optional parameters. It involves more typing
but it is far more readable than the first method discussed before.
Below is example of this way of invoking functions:
?salaryAfterTax(baseSalary:=5000, otherTaxCredits:=1000)
Using this method, you need to type the name of each parameter you want to pass with colon and equation mark (:=) after that, and
specify the value of this parameter. All the parameters that you want to omit are simply ignored.
This method of invoking functions is the only way to pass parameters in the other order than it was specified in this function's
definition.
The function above would work as well if you invoke it this way (note the reversed order of input parameters):
?salaryAfterTax(otherTaxCredits:=1000, baseSalary:=5000)
Nesting functions
In VBA, just like in Excel worksheet, it is possible to nest functions. It means that a function can be passed as
an input parameter for another function.
Below is an example of nesting functions. In that example function salaryAfterTax is invoked with another function
(Abs) passed as its input parameter:
?salaryAfterTax(Abs(-5000))
When interpreting such expression, the compiler starts from the most inner function, in this case it is function Abs(-5000).
If another function would be passed as an input parameter to Abs, the VBA compiler would start interpreting result from
this function.
When nesting functions you need to pay attention to types of data required for input parameters and returned by nested functions. For
a better understanding, let's have a look at the example below.
Paste the function below into your VBA editor:
1
2
3
			Function returnText() As String

			    returnText = 5000

			End Function
This function takes no input parameters and it always returns 5000. The value returned by this function seems like a number
but in fact this is a String, since that is how the function was defined (notice the keywords As String
at the end of the function declaration line that defines the type of value returned by this function).
Now, try to run in the Immediate window the following query:
Although you pass string parameter (5000) while the function requires numeric parameter, it works without any issues, since
the compiler could easily convert text 5000 to the number with the same value.
Now, try to run a similar query in the Immediate window, but this time pass the result of function returnText
instead of text 5000. As you remember, function returnText always returns text 5000 so theoretically
this code should be executed without any issues, since the input parameter is exactly the same as before, only the way of
passing it is different.
?salaryAfterTax(returnText)
However, if you try to run this code, you will see that the macro behaves completely different this time. VBA editor didn't even run this
function and error message Run-time error '13': Type mismatch. has been displayed instead.
The conclusion is clear: Be very careful with the types of data passed as input parameters to other functions. If you want to use the
result of a VBA function as an input parameter in another function, make sure that the type of data returned by this function is exactly
the same as the type of data required for this input parameter.
There is a way to overcome those limitations by using
conversion functions presented in the previous lesson.
If a function requires a parameter of Long type and you want the result of a function that returns
String type to be passed as this parameter, first you need to convert it into the required data type
by using a proper conversion function (in this case VBA.CLng).
Below is the same statement modified to avoid this error by using conversion function VBA.CLng:
?salaryAfterTax(VBA.CLng(returnText))
There are two functions nested here in the function salaryAfterTax - custom function returnText and built-in
function VBA.CLng. As it was mentioned before, the compiler starts interpreting results from the most inner function - in this
example this is function returnText that always returns text 5000. This text is then passed to the built-in function
VBA.CLng which converts it to the number of Long type having the same value.
Finally, value 5000 (already as Long type after conversion by VBA.CLng function) is passed as an
input parameter to the main function salaryAfterTax.
In Excel formulas nesting is limited to seven levels. Such limit doesn't exist in VBA, however, nesting more than 3 functions within each
other is a bad practice, since it makes the code unreadable and error prone.
Displaying messages for users
Displaying messages for users is a very important part of developing software. By using messages you can inform users about a
lot of things that happens in your application like missing files or folders, errors that occurred in the application or the
information that your macro has successfully completed its tasks.
As a basic example, below is a simple macro that displays a short message. Paste it in your VBA editor and run it to see how it works.
1
2
3
			Sub displayMessage()

			    Call MsgBox("Hello! This is the macro showing how to display messages.")

			End Sub
The only task performed by this macro is displaying on the screen the message box like below:
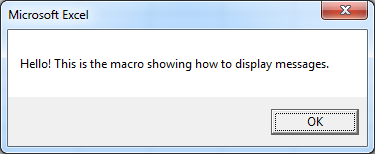
Excluding open and end statement, there is only one instruction in this macro: MsgBox, that is a VBA built-in function
responsible for displaying message for users and read users' responses to those messages.
Every time the compiler invokes MsgBox function, pop up window is displayed on the screen and the application stops
executing code and it is frozen until the message box is closed.
The syntax of MsgBox function looks like below:
1
2
3
		Function MsgBox(Prompt As String, _

		     Optional Buttons As VbMsgBoxStyle = vbOKOnly,  Optional Title As _

		    String,  Optional HelpFile,  Optional Context) As VbMsgBoxResult
The three most important input parameters of this function - Prompt,
Buttons and
Title - have been described below.
Prompt
Prompt parameter is the only one that is required by function MsgBox (other parameters are optional).
It defines what text is displayed in pop up window.
In the example above parameter Prompt was defined as Hello! This is the macro showing how to display messages.
and exactly the same text was presented in the message box that popped up on the screen.
When displaying messages to users by using MsgBox function you are not limited to single-line messages. There are some special
characters in VBA that allow to include new lines and tabulators within a plain string.
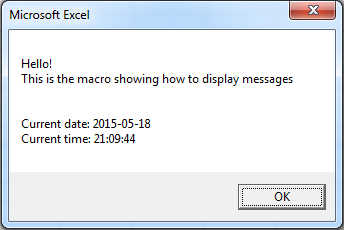
In the code below the message had been modified in that way that the current date and time had been appended in new lines at the end of
the previous message. In order to obtain the current date and time
VBA built-in functions VBA.Date and VBA.Time had been used:
1
2
3
4
5
6
				Sub displayingMessage()

				    Call MsgBox("Hello!" & vbCrlf & "This is the macro showing how to display messages " & _

				        vbCrLf & vbCrLf & vbCrLf & _

				        "Current date: " & VBA.Date & vbCrLf & _

				        "Current time: " & VBA.Time)

				End Sub
As you can see in the code above, in order to move a part of the text into the new line, you need to extract this
part as a new string and put the command & vbCrLf & between those strings as many times as many new
lines you want to add. The part of text after vbCrLf tag will appear in the new line.
In our last example tag vbCrLf have been put three times in row after text This is the macro
showing how to display messages.. It means that in addition to moving the rest of the text to the new line,
two empty lines should be inserted into the message.
After invoking the code above, the message box like below should appear on the screen:
Besides moving a part of text to the new line, it is also possible to separate two parts of text with tabulators.
The code below is another modification of our function for displaying message - Current date and Current
time labels have been separated from their values with a few tabulators.
1
2
3
4
5
6
				Sub displayingMessage()

				    Call MsgBox("Hello!" & vbCrLf & "This is the macro showing how to display messages." & _

				        vbCrLf & vbCrLf & vbCrLf & _

				        "Current date: " & vbTab & vbTab & VBA.Date & vbCrLf & _

				        "Current time: " & vbTab & vbTab & VBA.Time)

				End Sub
After modification the message displayed by the code will look like below:
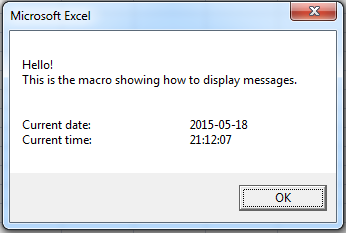
In order to separate two parts of text from each other with Tabulator you need to put the command & vbTab &
between those two parts of text as many times as many tabulators you want to separate them.
vbCrLf and vbTab can be used not only when displaying messages for users with
MsgBox function, actually they can be part of every string.
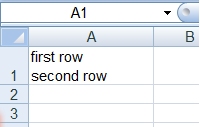
For example, if you call the code below in the Immediate window:
Cells(1,1) = "first row" & vbCrLf & "second row"
this text would be displayed in the cell A1 of the current Excel worksheet the way it is presented on the picture below:
Buttons parameter is responsible for the layout of buttons and icons on the message box.
All the properties that can be modified by Buttons parameter are listed below:
- number of buttons on the message box,,
- default button,
- icon to be displayed next to the message,
- horizontal alignment of the text.
For each of the properties above there are some available values that are described in details below.
You don't need to specify all the properties. You can define only some of them, the rest will simply get their
default values.
If Buttons parameter is omitted at all, each property get its default value - the message box would
contain only a single OK button that would be the default one, without any icon and with text aligned to the left.
Specifying properties looks in the code as if the values were added to each other - all values are separated with plus
sign (+). At the end of this chapter you can find a few examples of invoking MsgBox function with a complex
value given as a Buttons parameter.
The first property that can be defined in the Buttons parameter is the number and names of buttons to
be displayed in the message box.
If this parameter is omitted, only OK button is displayed on the message box.
All the available sets of buttons are listed in the table below. Keep in mind that the names listed in the left
column (vbOkOnly, vbOKCancel etc.) should be put in code without quotation marks,
since they are not string but
enumerations.
Number and names of buttons
| VALUE | DISPLAYED BUTTONS |
| vbOKOnly | OK |
| vbOKCancel | OK | Cancel |
| vbAbortRetryIgnore | Abort | Retry | Ignore |
| vbYesNoCancel | Yes | No | Cancel |
| vbYesNo | Yes | No |
| vbRetryCancel | Retry | Cancel |
The exact names displayed on buttons depend on the system version installed on user's computer. Unfortunately, it
is not possible to put custom names instead the default ones. But don't worry, later on this tutorial you will
learn how to create your own, more complex dialog boxes with all the controls and properties editable.
The purpose of putting different buttons on a single message box is to allow users to decide what action the
application should take. Examples of the applications taking different actions depending on user's choice will be
presented in the next lesson after we learn how to use
conditional statement If.
that is crucial when creating this type of code.
For now just remember that pop-up window displayed by MsgBox can contain different sets of buttons.
There is no point to learn them by heart, since you can always take a look at the table above. Furthermore, when
specifying value for parameter Buttons editor shows the list of all available values, so you can also
spare some time because you can just select the desired value from the list instead of typing its entire name.

However, in this case Intellisense is not as helpful as in earlier examples, since values for all
properties defined in Buttons parameter are mixed together and shown on the same list. This makes the
list longer and values are harder to be found.
Fortunately, their names are quite descriptive and it is quite simple to find out their meaning.
If the message box displayed on the screen contains Cancel button (so vbOKCancel,
vbYesNoCancel or RetryCancel value has been passed in parameter Buttons),
pressing Esc key on the keyboard or clicking X icon in the top-right corner of this message box would have
the same effect as clicking Cancel button.
If there is no Cancel button, OK button takes over this role.
If there is neither Cancel nor OK button, pressing Esc key has no effect and X icon in the
top-right corner is disabled. The only way to close such message box is by clicking one of buttons displayed on
this message box.
The second property that can be defined in Buttons parameter is what button should be active by
default when displaying message box.
The values for defining default button are so simple that there is even no point to discuss them, but for the
consistency of the lesson they are listed in the table below:
Values defining default active button
| VALUE | DEFAULT BUTTON |
| vbDefaultButton1 | first button is active by default |
| vbDefaultButton2 | second button is active by default |
| vbDefaultButton3 | third button is active by default |
| vbDefaultButton4 | fourth button is active by default |
Again, those value should be inserted in the code without quotation marks, since they are not strings but enumerations.
If the total number of buttons is less than the index of default button (i.e. message box has only two buttons - OK
and Cancel, but at the same time it was defined that third button is default, because vbDefaultButton3 value was
passed as a parameter), the first button automatically becomes the default one.
The next property that can be defined in Buttons parameter is icon to be displayed next to the
message.
All the icons available in MsgBox functions are listed below:
| VALUE | ICON |
| vbCritical |

|
| vbExclamation |

|
| vbInformation |

|
| vbQuestion |

|
Additionally, each icon is bound to a sound that is also generated when message box is being displayed on the screen.
If this value is not defined, no icon is displayed on the pop up window.
The last property that can be modified by Buttons parameter is text alignment.
There is only one value available here - vbMsgBoxRight that will make the text to be aligned to the right.
If you want the text to be aligned to the left on your message box, you can just ignore this property when specifying
MsgBox format, since left alignment is default setting for this property.
Give only one value for each property! If you specify more values for a single property, the result can be unexpected.
Title
Optional parameter Title allows us to change the caption displayed on the blue title bar on the top of the message box.
By default, each message box has text Microsoft Excel set as its title. This text was displayed on every
message box we have invoked so far, since we have never defined value for parameter Title.
It is worth to spend some time and make sure all the message boxes are invoked with proper titles, since this
gives a professional look to your application and makes it user-friendlier.
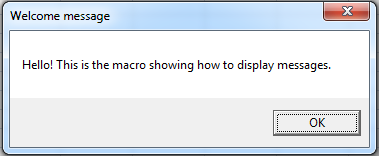
Below is the already well-known code for displaying welcome message, enhanced with the title.
1
2
3
4
			Sub displayingMessage()

			    Call MsgBox(Prompt:="Hello! This is the macro showing how to display messages.", _

			        Title:="Welcome message")

			End Sub
The message box displayed by this code looks like below. Note the title on the blue title bar on the top of the box.
Examples of MsgBox function usage
Below are a few examples of MsgBox function usage. Each example consists of the code snippet and the picture
showing how the message box with those particular settings would look like.
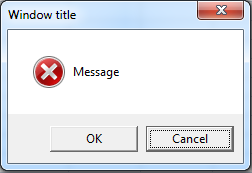
Message box with two buttons (OK and Cancel, where Cancel button is the default one) and critical icon.
1
2
3
			Sub displayingMessage()

			    Call MsgBox("Message", vbOKCancel + vbCritical + vbDefaultButton2, "Window title")

			End Sub
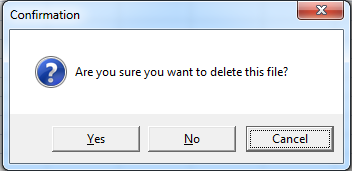
MessageBox with three buttons (Yes, No and Cancel, where Cancel button is the default one) and question icon..
1
2
3
4
			Sub displayingMessage()

			    Call MsgBox("Are you sure you want to delete this file?", _

			        vbYesNoCancel + vbQuestion + vbDefaultButton3, "Confirmation")

			End Sub
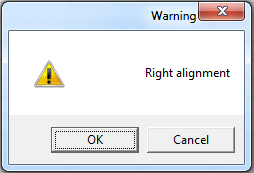
MessageBox containing two buttons (OK and Cancel) and warning icon, with text aligned to the right..
1
2
3
			Sub displayingMessage()

			    Call MsgBox("Right alignment", vbOKCancel + vbExclamation + vbMsgBoxRight, "Warning")

			End Sub
Besides the MsgBox function, designed for displaying messages and basic interaction with users (Yes/No, Confirm/Abort),
there is also another VBA built-in function that allows us to communicate with users - InputBox.
InputBox is intended to get more complex information from users, like passwords, names, dates or numeric values.
Copy the code below and paste it into VBA editor:
1
2
3
4
5
6
				Sub gettingValueFromUser()

				    Dim text As String


				    text = InputBox("Value to be printed in A1 cell")

				    Cells(1,1) = text

				End Sub
All this code does is display this window on the screen:
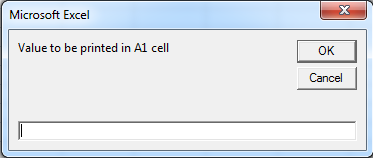
get the value input by user and put this value into cell A1 of the currently active worksheet.
In the second line of the code the String variable text is declared.
In the fourth line variable text is being assigned with the result of function InputBox,
so in fact the value typed by user in the pop-up window (the way this function works will be discussed in a moment).
In the final row before procedure end line the cell A1 of the active Excel sheet is populated with the value of
variable text.
In the procedure above the variable text could be omitted and the result of the function InputBox
could be put directly into cell A1 of the active worksheet:
Cells(1,1) = InputBox("Value to be printed in A1 cell")
It would even make the code shorter. However, it is done intentionally and the purpose is to make it your habit to
always declare variables.
Let's go back to the fourth row of the code where the function InputBox appears for the first time.
The syntax of InputBox function looks like below:
			Function InputBox(Prompt As String, _

			     Optional Title As String,  Optional Default, _

			     Optional XPos As Single,  Optional YPos As Single, _

			     Optional HelpFile,  Optional Context) As String
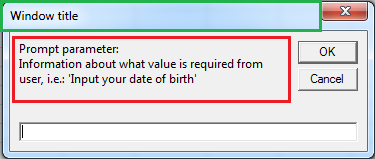
Prompt and Title parameters have been
already discussed in details in the chapter about MsgBox function. They works
exactly the same in the function InputBox: Prompt defines what text is displayed in the pop-up window
(it should be information what value is required from user, i.e. Input your birth date)and Title defines the caption
to be displayed on the window title bar. For better understanding both those sections are marked on the picture below - Title section is
bordered in green and Prompt section in red.
With Default parameter you can define what value the input box window should be initialized with. If this parameter is
left empty when invoking InputBox function, the text box on the pop up window will be empty as well.
XPos and YPos parameters defines the position on the screen where the pop up window should appear initially
(after it is already displayed you can move it wherever you want).
XPos defines the distance between pop up window and the left edge of the screen while YPos the distance between
pop up window and the top edge of the screen.
Both those values are measured in units called twips (1440 twips = 1 inch).
If both those values are omitted, the input box window will be displayed on the middle of the screen horizontally and about on the top
one-third of the screen vertically.
XPos and YPos parameters must be passed together. If you give only one of those parameters and leave the second
one empty, the function behaves as if none of them was passed.
Function InputBox, opposite to the MsgBox, doesn't allow to change the number and names of the buttons displayed
on the pop-up window. The only available option is the set of two buttons - OK and Cancel.
Below are two examples of InputBox function, each of them consisting of the code and the picture showing how the window looks
like with various sets of input parameters (examples are designed to call them in Immediate window, so we recommend to test it by
yourself).
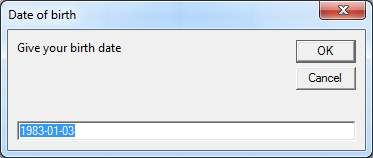
Input box asking about date of birth with default value 3 January 1983, laid out 1 inch from the top and 1 inch from
the left edge of the screen.
?InputBox("Give your birth date", "Date of birth", #1983-01-03#, 1440, 1440)
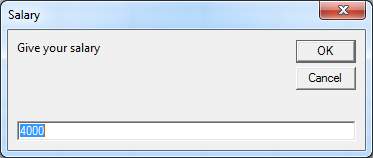
Input box asking about salary with default value 4000 without initial position defined.
?InputBox("Give your salary", "Salary", 4000)
Simple examples of dialog applications
In order to fix your knowledge, let's analyse a few examples of small applications using features described in this lesson -
MsgBox and InputBox, as well as some features you have learned earlier.
Calculating net salary
Our first example is the modified version of the function for calculating net salary that we have created earlier in this lesson.
Two features have been added to the previous version of the function - getting information about gross salary directly from a user
(by using InputBox window) and displaying the result in a separate message box after the calculation is done (by
using MsgBox function).
			Sub salaries()

			    Dim grossSalary As Long

			    Dim netSalary As Long


			    grossSalary = InputBox("Enter gross salary", "Gross salary")

			    netSalary = salaryAfterTax(grossSalary)


			    Call MsgBox("Salary after tax: " & netSalary, _

			                        vbOKOnly, "Net salary")


			End Sub
1
2
3
			Function salaryAfterTax(gross As Long) As Long

			    salaryAfterTax = gross - (gross * 0.18)

			End Function
Let's discuss this example in details. However, most of the code above should be clear for you, since we used it
many times in the previous lessons.
In rows 2-3 two variables of Long are declared: grossSalary and
netSalary.
In row 5 variable grossSalary is assigned with the result of function InputBox - that is,
with the input a user entered in InputBox window.
When invoking InputBox function, apart from mandatory parameter Prompt, obligatory parameter Title
is also specified (it means the value given as this parameter - Gross salary - will be displayed on the title bar on the top of
InputBox window).
Note that InputBox function returns the value of String type, so even if you enter date or
number, its text representation is returned instead of the original value.
Fortunately, as it was already mentioned in the lesson about data types, when assigning text value to a variable of numeric type, VBA automatically converts it to the proper
data type (unless it is not possible, i.e. text abc is assigned to a variable of numeric type).
In row 7 the variable netSalary is being assigned with the result of function
salaryAfterTax for parameter gross equal to variable grossSalary (so the value entered by user
in InputBox window).
In row 9 MsgBox function is being invoked to display the information on the screen about how
much net salary is for the given gross salary. Message box window has OK button only and text Net salary is displayed
on the title bar.
There is still a few of things that could be improved in the code above, especially with regard to input data validation. What
happens if a user enters text instead of number in the input box asking about gross salary? In professional, user-friendly applications
it should cause a separate window to be displayed on the screen with information about error, its source and the way to fix it.
So far, our small application is not secured against such issues and VBA generic error is thrown every time a user pass text when
number was required. Such VBA built-in error messages are hardly understandable for users and should be avoided and replaced by
your own error warnings and messages.
However, we cannot do it right now, since we have not yet discussed conditional statement If ... Then.
This topic will be covered in the next lesson and we will get back to this example then.
Calculating the length of period in months, weeks, days etc.
In this example we will create a small application that takes the user's date of birth, calculate how many months, weeks and days have
passed since this date and finally, display this information on the screen in a separate message box.
1
2
3
4
5
6
7
8
9
10
11
12
13
14
15
16
17
			Sub calculatingTime()

			    Dim dateOfBirth As Date

			    Dim months As Long

			    Dim weeks As Long

			    Dim days As Long


			    dateOfBirth = InputBox("Enter your date of birth", "Date of birth")

			    months = DateDiff("m", dateOfBirth, Date)

			    weeks = DateDiff("ww", dateOfBirth, Date)

			    days = DateDiff("d", dateOfBirth, Date)


			    Call MsgBox("You have been living for: " & vbCrLf & _

			                months & " months" & vbCrLf & _

			                weeks & " weeks" & vbCrLf & _

			                days & " days", vbOKOnly, "How long have you been living?")


			End Sub
In rows 2-5 all the variables used in the application are declared. Variable dateOfBirth is of
a Date type and it stores the date of birth entered by user. The remaining three variables -
months, weeks and days - are of Long type and they are used to
store the difference between the current date and the date given by user, measured in various units.
In row 7 the variable dateOfBirth is assigned with the result of function InputBox,
this is, the date entered by user in the input box window.
In the next three lines the application calculates the difference in months, weeks and days between the date given by user
and the current date, and assign them to the proper variables.
In each of those lines two VBA built-in functions have been used:
-
DateDiff - used to calculate
the difference between two dates.
-
Date - used to get the current date.
After all the differences are calculated and assigned to the proper variables, the message box with the results pops up
on the screen (rows 12-15).
Note that when defining the message body, command vbCrLf has been used several times. It makes each value is displayed
in the separate line and the whole message is much more readable.


